Create a full-stack registration page in Node.js

I am a MERN stack developer and a 3rd year student of KIIT, Bhubaneswar. I've just started blogging, because why not :) This place is where I strengthen my knowledge and post everything that I learned by building new projects.
In this tutorial, we will be building a full-stack registration page using Node.js. We will be storing data in a remote MongoDB database and use express.js for the operations.
Prerequisites
I am expecting that you already know the basics of node.js, mongoose and, basic rendering of HTML pages using template engines like Ejs. However, I'll try my best to explain each and every step. The least I am expecting is that you have worked with HTML5 and have Node.js installed on your device.
Package.json
The first step will be to install all our dependencies. First of all, create the root folder which will be storing all our files. Let's name it "signup-form". Now, head over to your terminal/cmd and open that folder. To create a package.json file, type "npm init -y". This command creates a package.json file that will keep track of all our dependencies. Dependencies are basically the packages on which our project is dependent. After this command, you can see a package.json file in your folder. Now, head over to your terminal again and install express and mongoose. To do that, type "npm i express mongoose ejs". After installation, you can see that inside your package.json file under the dependencies section, we have our express, mongoose, and ejs. And we also have a "node_modules" folder inside our root directory.
Creating the form
So before creating the form, we will create a folder inside our root folder and name it as "views". It is mandatory to have a folder called views when using a template engine. It basically stores all our template files(you can call them HTML files). Then create a file called "index.ejs". ".ejs" is the extension for ejs files. It has almost the same syntax as HTML files. Create the basic layout, for example:
<!DOCTYPE html>
<html lang="en">
<head>
    <meta charset="UTF-8">
    <meta http-equiv="X-UA-Compatible" content="IE=edge">
    <meta name="viewport" content="width=device-width, initial-scale=1.0">
    <title>Document</title>
</head>
<body>
    <h2>Sign up form</h2>
    <form action="/" method="POST">
        <label>Full Name</label>
        <input type="text" name="fullname" placeholder="Fullname">
        <label>Email</label>
        <input type="text" name="email" placeholder="Email ID">
        <label>Password</label>
        <input type="password" name="password" placeholder="Password">
        <label>Mobile no.</label>
        <input type="text" name="phone" placeholder="Mobile no.">
        <input type="submit">
    </form>
</body>
</html>
Notice that the form has an attribute called action which stores the path of our API endpoint. If you do not understand what that means then stick with me a little longer and everything will start getting clearer. It also has an attribute called method which is set to 'POST'. And every input has to have a name attribute that will be used to access our input data. When we want to store something in our database we use the 'POST' method. With that, our form is created. If you want to add CSS then create another folder called "public" inside the root folder. Inside it create another folder called "css" and store all your CSS files there. The same applies to JS files if you have any.
Setting up our database
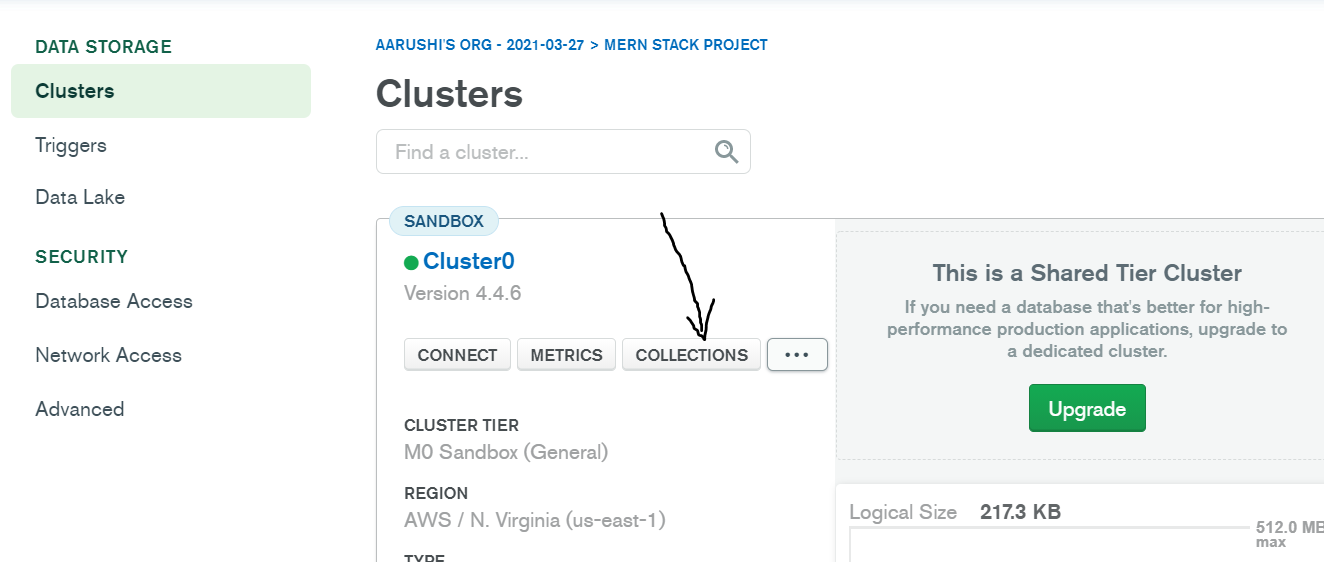
I am using MongoDB as the database. To use a remote MongoDB database we will be using MongoDB Atlas. So go ahead and create an account, create a new project and after that create a cluster on it and do remember your password 'cause we will be needing that. If you already have a cluster then you don't need to create another one. First, click on the "connect" button and choose "connect your application" option.

You'll get a link similar to this:
mongodb+srv://<Your_username>:<password>@cluster0.pjb8r.mongodb.net/myFirstDatabase?retryWrites=true&w=majority
Copy it somewhere safe and replace the "" with your password without using "<>" and replace "myFirstDatabase" with your database name which we will be setting in a minute. Close the dialog box. After that click on "collections" > "create database". Name your database and your collection as "Signup-form" and "users" respectively.
Backend Code
Inside our root folder create a new folder called "db" and inside it create a new file called "connect.js". Here, we will be connecting our database to our server. We will be needing the db link that we copied earlier. Paste the below code inside connect.js:
const mongoose=require("mongoose");

mongoose.connect("mongodb+srv://Username:password@cluster0.pjb8r.mongodb.net/Signup-form?retryWrites=true&w=majority",{
    useCreateIndex:true,
    useNewUrlParser:true,
    useUnifiedTopology:true
})
.then(()=>{
    console.log("Connection successfull with db")
})
.catch(err=>{
    console.log("Connection to db not successfull due to",err);
})
We are requiring/importing the mongoose module into our file and storing it into a variable. Mongoose.connect takes the URL of your database and returns a promise. If the promise is fulfilled then we log that "connection is successful" or else we catch the error, pass it as an argument and log the respective error/message. I hope you're able to understand even 70% of what I'm trying to explain.
Next, we create a schema or structure of the data that we want to store in our db. Create another folder inside our root folder and name it as "models". Create a file "user.js" inside it:
const mongoose=require("mongoose");
const userSchema=new mongoose.Schema({

    fullname:{
        type:String,
        required:true
    },
    email:{
        unique:true,
        type:String,
        required:true
    },
    password:{
        type:String,
        required:true
    },
    phone:{
        type:String,
        required:true,
        minLength:10,
        maxLength:10
    },


})

const User=new mongoose.model("USER",userSchema);
module.exports=User;
This code is also very simple. We're creating a schema and its instance, and lastly, we're exporting it so that we can use it wherever required.
The Endgame
In our last step, we will be taking input and storing it in our database. Create a new file called "app.js" inside the root directory.
const express=require("express");
const User = require("./models/owner");
const app=express();
require("./db/connect");
Here, we are importing express and storing all its functionalities inside a variable called app. We are also importing our user schema and the connect file. Next, set the view engine as ejs and create the get endpoint of our API. Render the index.ejs file.
app.set('view engine','ejs')

app.get('/',(req,res)=>{
    res.render('index');
})
Then we will create the post endpoint.
app.post('/',async (req,res)=>{
    try{

        const user=new User({
            fullname:req.body.fullname,
            email:req.body.email,
            password:req.body.password,
            phone:req.body.phone
        })

        const result=await user.save();
        console.log(result);
        res.status(200).render('success.ejs');

    }
    catch(err)
    {
        res.status(404).send(err);
    }
})
Here, we are taking the data from req.body.data where "data" is the "name" attribute in our frontend form. We are storing that data into our "user" instance of our schema. That is why the variable names are the same as we provided in the schema file. "User.save()" stores the data in our database. After it has been stored we are rendering a file "success" which has nothing but a simple "Registered successfully" text.
<!DOCTYPE html>
<html lang="en">
<head>
    <meta charset="UTF-8">
    <meta http-equiv="X-UA-Compatible" content="IE=edge">
    <meta name="viewport" content="width=device-width, initial-scale=1.0">
    <title>Document</title>
</head>
<body>
    <h2>Registered successfuly</h2>

</body>
</html>
Then, we will run our files on local host:
app.listen(port,()=>{
    console.log(`server is running at port 3000`);
})
And done! Run the command "node app.js" on your terminal and open "http://localhost:3000/" in your browser. Your full-stack signup form is ready! Fill up the form quickly and submit it. Head over to your database and click on the refresh button. You can now see your stored data.
Byeee!
I hope this article helped you even a little bit. Don't forget to give your feedback and hit the follow button to get more such tutorial. Happy coding! Take care!.


